Mining bitcoins with p2pool
Here is my experience and testimonial with mining bitcoins with p2pool, I don’t know all that much about it’s inner workings but I assume that I have worked out a somewhat reasonable formula for success. You need to have a few things in line for this to be a profitable venture guaranteed. First off is the cost of electricity. If you have to pay for it you need to look at wattage vs gigahash closely. If power is not an issue then any old antminer will add a few gigahash to your pool and hence further your chances of hashing shares concurrently into the sharechain and hence earning a payout when a block is solved. Bitcoin is pretty deep and you can learn a lot from mining it. You will be exposed to it. Once you start doing it you will try to refine your approach and hence will become more familiar with it’s workings which I won’t go into much here. There are a ton of good videos on youtube for that. The focus here mainly is mining bitcoins with p2pool. I am not sure what the usage would cost for a few antminers so, I would say approach with some caution.
ASIC miners can be cheap when the power efficiency of them is slightly outdated. An ASIC miner is the only real way to mine BTC now. Mining p2pool with a hundred next gen Xeon processors wouldn’t compare to modern ASIC miners. That is why some coins have chosen to be ASIC resistant like Dash. I grabbed a few Antminer S1‘s this year (2015) for $100 CDN each and bough a PSU for each of them on sale for $50 CDN and had a mini mining operation on my hands. I had no idea how to make it work and finally feel like I can make a few common sense suggestions to make sure you can be profitable. First things first you need a good PSU for mining you can’t cheap out and you need to be sure to have a good amperage on your PCI-E 12V rails. You also want 2 of them for an Antminer but the main focus here is amperage. On average an Antminer S1 is going to run at about 4 amps. That is just a rough guestimation. You need 2 PSU’s for an Antminer S3 for overclocking. The big thing is what Amperage can run on that 12V PCI-E rail. The Corsair 500w single rail PSU with a 30A PCI-E 12V rail is perfect. They are great for stability. I use a 500W Corsair 80 Bronze rated PSU. The main thing to be careful of is the number of PCI-E rails. Single is better with high amperage. Some PSU’s just can’t cut it under the load and I find these Corsair PSUs to be reliable, here they are presently a good price. You don’t want the cables to get warm to the touch. So far my 3 PSUs (one made by EVGA) are holding up great with no scorching or heat on the lines. Cheap PSU’s just won’t do if they pose any risk.
Next, you’ll need a computer that you can run day in and day out with a good CPU in it and 4 gigs of RAM and an SSD in it; on which you store the blockchain. This SSD needs to fit the blockchain data files which presently weigh in at about 43 Gb and will constantly grow. So leave a good amount of breathing room on this disk. This machine is going to have to have a few packages installed. First get Python 2.7 and python-argparse as well as Twisted or python-twisted on linux They all pertain to python and different libraries that necessary to make P2Pool work. Python 2.6 is one of the first things you will need. This is assuming you are using a Windows installation. I took this all from this initlal post on bitcoin talk. First download the Bitcoin Core, this is the wallet that your miners will be getting transactions from and will be the link to the p2p BTC backbone via a node. Running your own node requires you to download the blockchain and index it. This requires a good while from scratch so downloading the bootstrap and placing it where it needs to go. This can speed up indexing the entire blockchain which is every transaction every made using BTC. It needs to download and slowly verify and it can take a day or so on a good connection with your firewall port forwarded for your node at port 8332. You also want to find the Bitcoin folder in the program files folder and configure the wallet into server mode. Create a file called bitcoin.conf in notepad and enter the following:
server=1
daemon=1
rpcuser=somethinghere
rpcpassword=somethingherehardtocrack1923234234098234
rpcallow=127.0.0.1
minrelaytxfee=0.00001
mintxfee=0.00005
limitfreerelay=7
This will set your bitcoin core wallet into server and daemon mode running in perpetuity, well that is the hope. Two of those lines set minimum thresholds on transactions. I am not sure these settings are right for you. The truth is once you start down this path of running your own node you now have some server admin responsibilities. Downtime is not really an option when mining bitcoins with p2pool so make sure things are chugging along every few days at least. The simplest way to run bitcoin and specify where to keep the blockchain is with the command line or by adding an argument to a shortcut. Try not to shut the computer down improperly or you risk corrupting the blockchain and being taken out of commission for a day or so while it reindexes. In that case it’s best to sign up with a few pools. That way you can add them in the miner config as fall back pools if yours goes down for say, an automatic update. I store or look for the blockchain at a path of my choosing by running:
<pre class=”prettyprint”> C:\”Program Files”\Bitcoin\bitcoin-qt.exe -datadir=G:\Pathiwant\
</pre>
Now download P2Pool 14.0 or higher. The reason is now that BIP66 has gone into effect, mining bitcoins with p2pool’s old versions are now unable to mine on the current blockchain. This is due to the hardfork of P2Pool to keep compliance with BIP66. Since these changes I have had pretty good luck since I put everything on an SSD and fired up a few tweaked antminers.
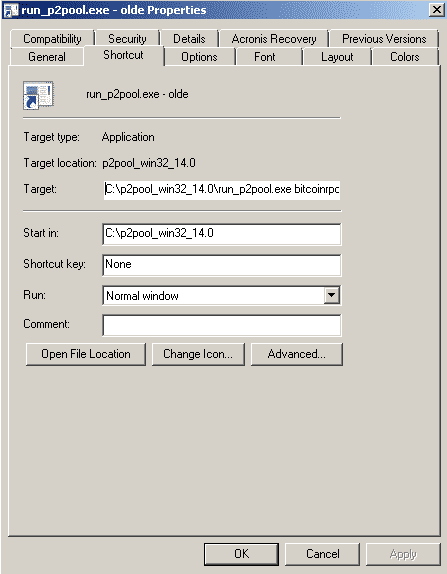
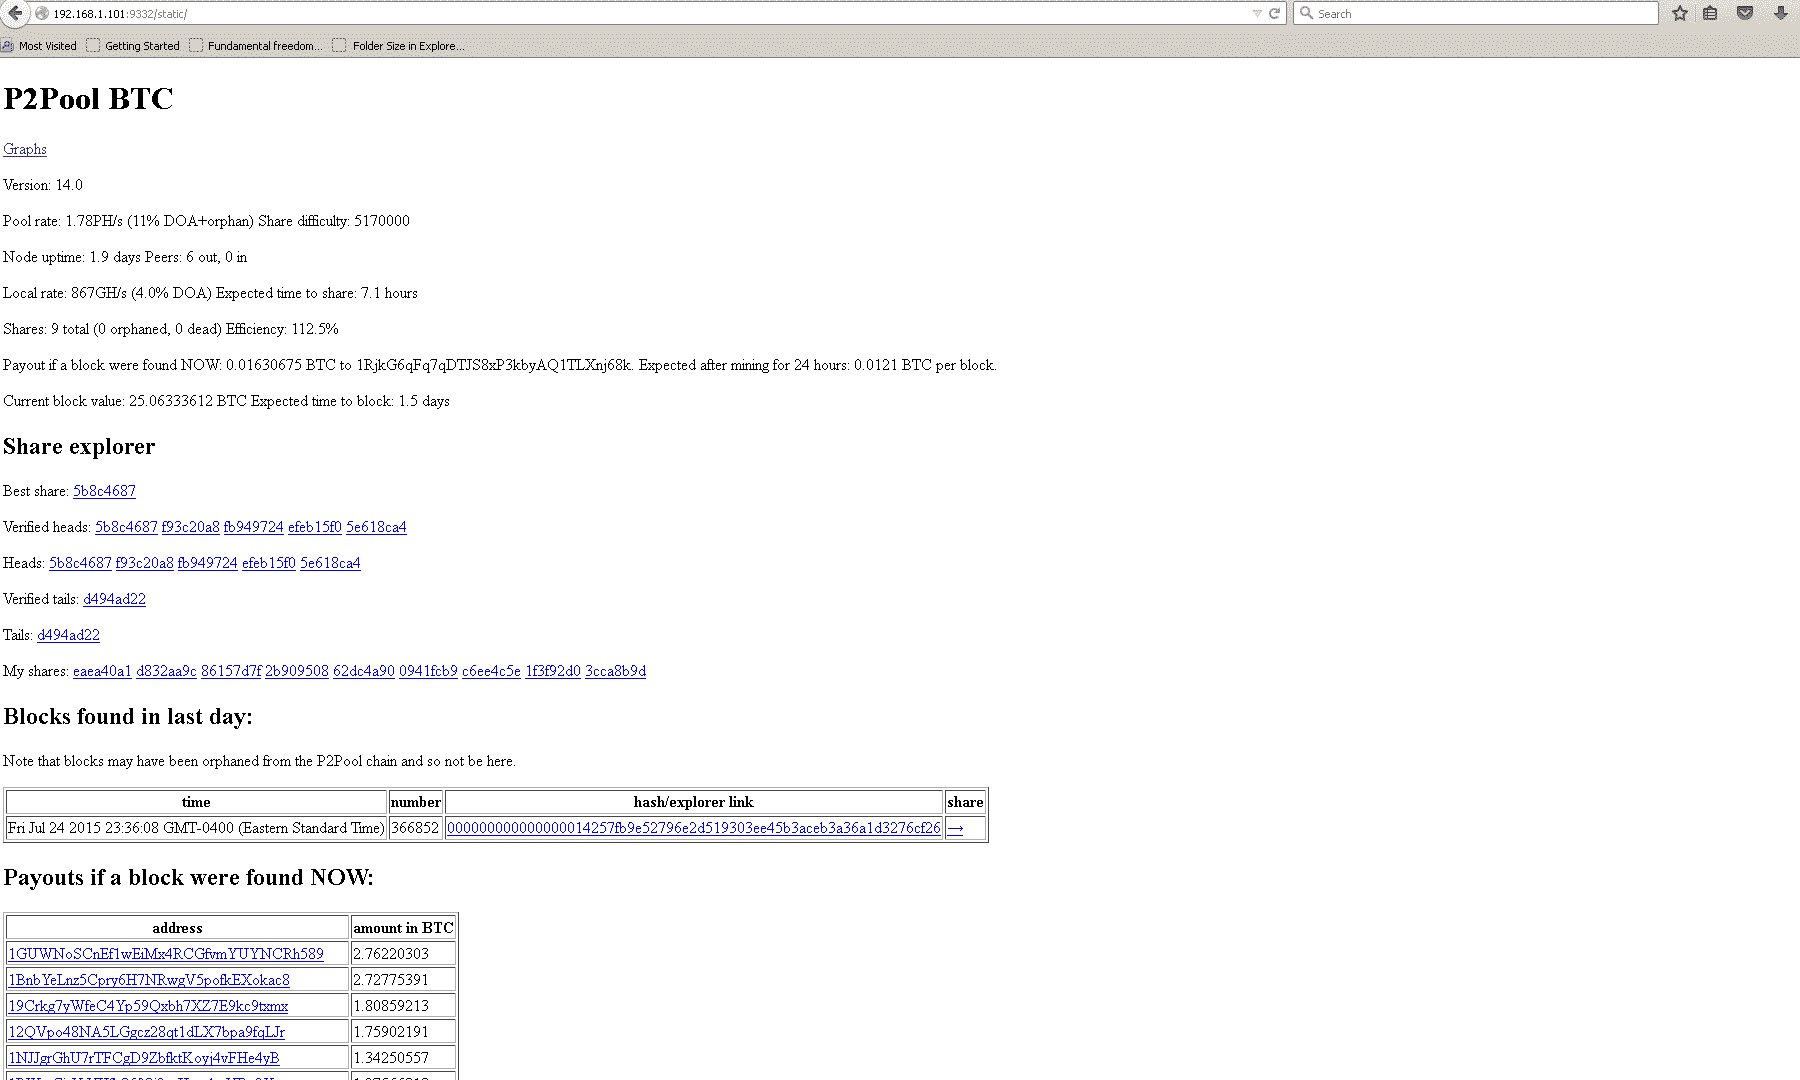
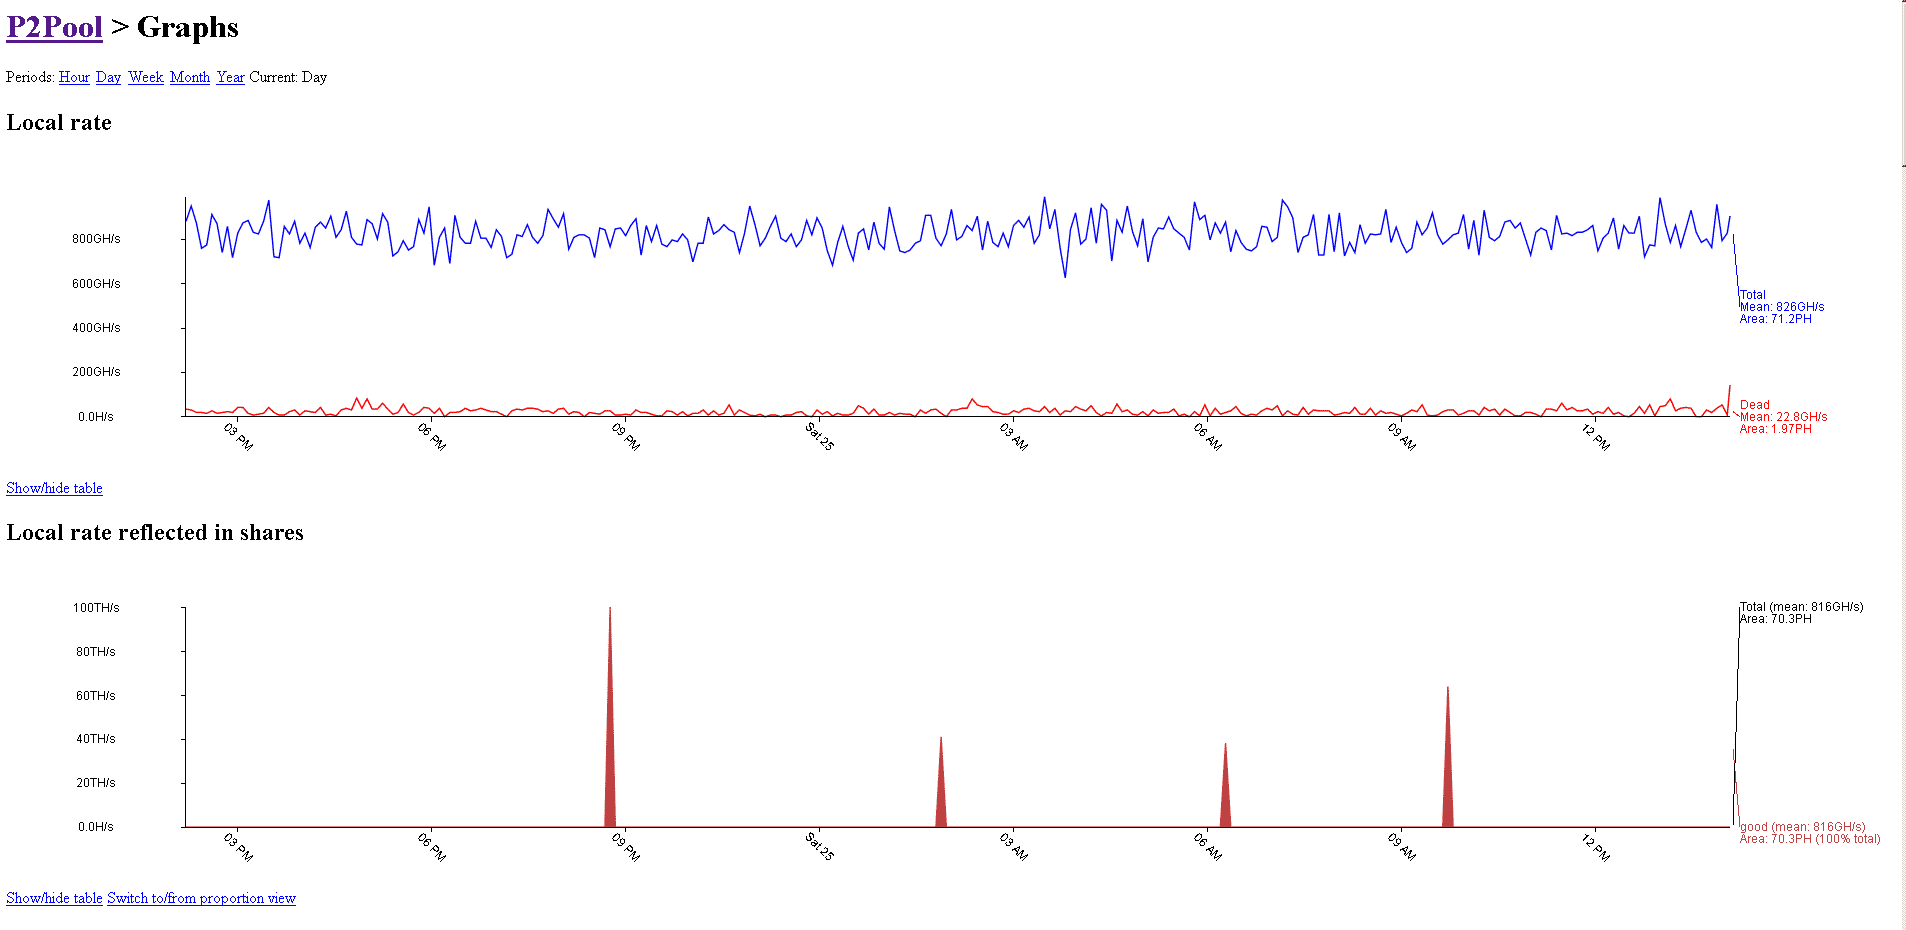
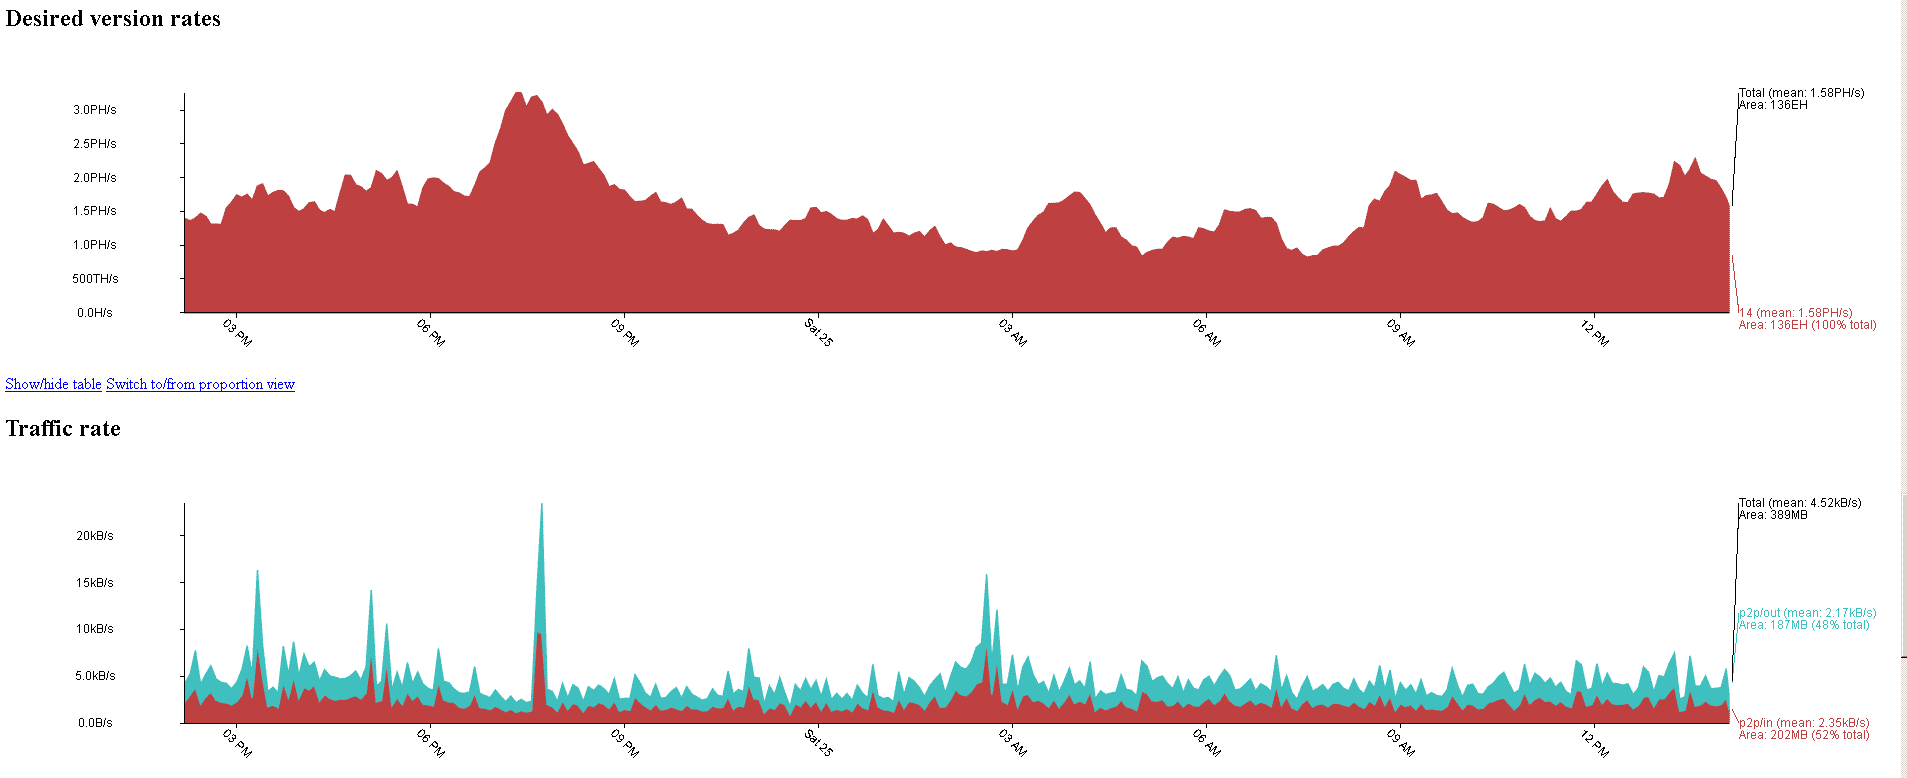
To get P2Pool running you need to create a shortcut to the application by right clicking on the executable file. Then right click the shortcut and select properties. Then in the target field add your user and password you had selected in your bitcoin.config file. You have to get the syntax right here. Look at the photo below. When you want to look at some graphs of your performance just hit your loopback IP or localhost at port 9332. will do.
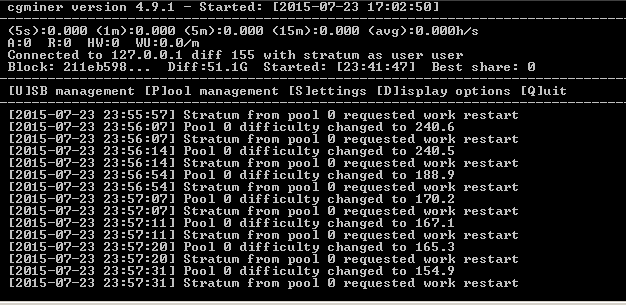
Next you need to do the same for cgminer’s application, adding some flags to the target of the shortcut. Add the below text after the path to the program with a single space.
[box color=”green”]-o -u user -p password -btc-address (whateveryouraddressisinyourbtcwalletbecarefulenteringit)[/box]
Run the BTC core wallet, wait for it to load. Be sure you got your wallet address right. Then when that is done run your P2Pool shortcut, let that sync. Then run cgminer from your shortcut. And point your miners to the node IP using the prefix of stratum+tcp//192.168.the.IP:9332.
Getting the miner to respond can be difficult when you first get it. To get the miner to turn on when you flip the PSU switch on you need to short two pins on the main 24 pin cable from the PSU. It’s actually necessary and common practice to insert a cut-down paperclip into the end of the cable. Some smaller ones work perfectly. Here is a guide. Please be safe. Take proper precautions with electricity mains always. Don’t have anything plugged in while doing this.
The beast lives…
Now that you have it on and the lights are blinking hypnotically and it’s whirring and making noise it’s not mining bitcoins on p2pool yet, you need to get into it via the web GUI and your browser. Check the miner for an IP marked on the case and type it in like this obviously one at a time. Turning off DHCP and getting the network settings all set up is a little confusing, just make sure you don’t duplicate IP addresses and you should be fine. Try pinging it always first. If you can’t get anything there, I’d suggest a factory reset. Possibly then making sure it is the only LAN port plugged in and making things simple. For factory resets there is a strange offset button on the S3 by the LAN port and visible on the control board of the S1; if things just won’t work. To reset it, let the S3 boot up fully, give it some time. Then hold the reset toggle for ten seconds, wait for a few minutes, rinse (sic) and repeat. The S1 is more simple . Then plug it straight into a PC’s LAN. Set the IP to something matching the same subnet as marked on the case of your miner. Then try to punch the default IP into your browser and use the default login for the GUI.
user: root
password: root
[box color=”green” icon=”config”]Immediately change these for security in the system tab.[/box]
I set the difficulty on my miners. To make sure I don’t sweep up all the low hanging fruit from less capable miners. It’s done by adding a few numbers to the miner name. Some suggest not setting it and letting the pool set the difficulty. The number thrown around for an S1 is miner/256+256. I am testing this currently. When configuring make sure to give each machine a new miner name so the logs see them as individuals.

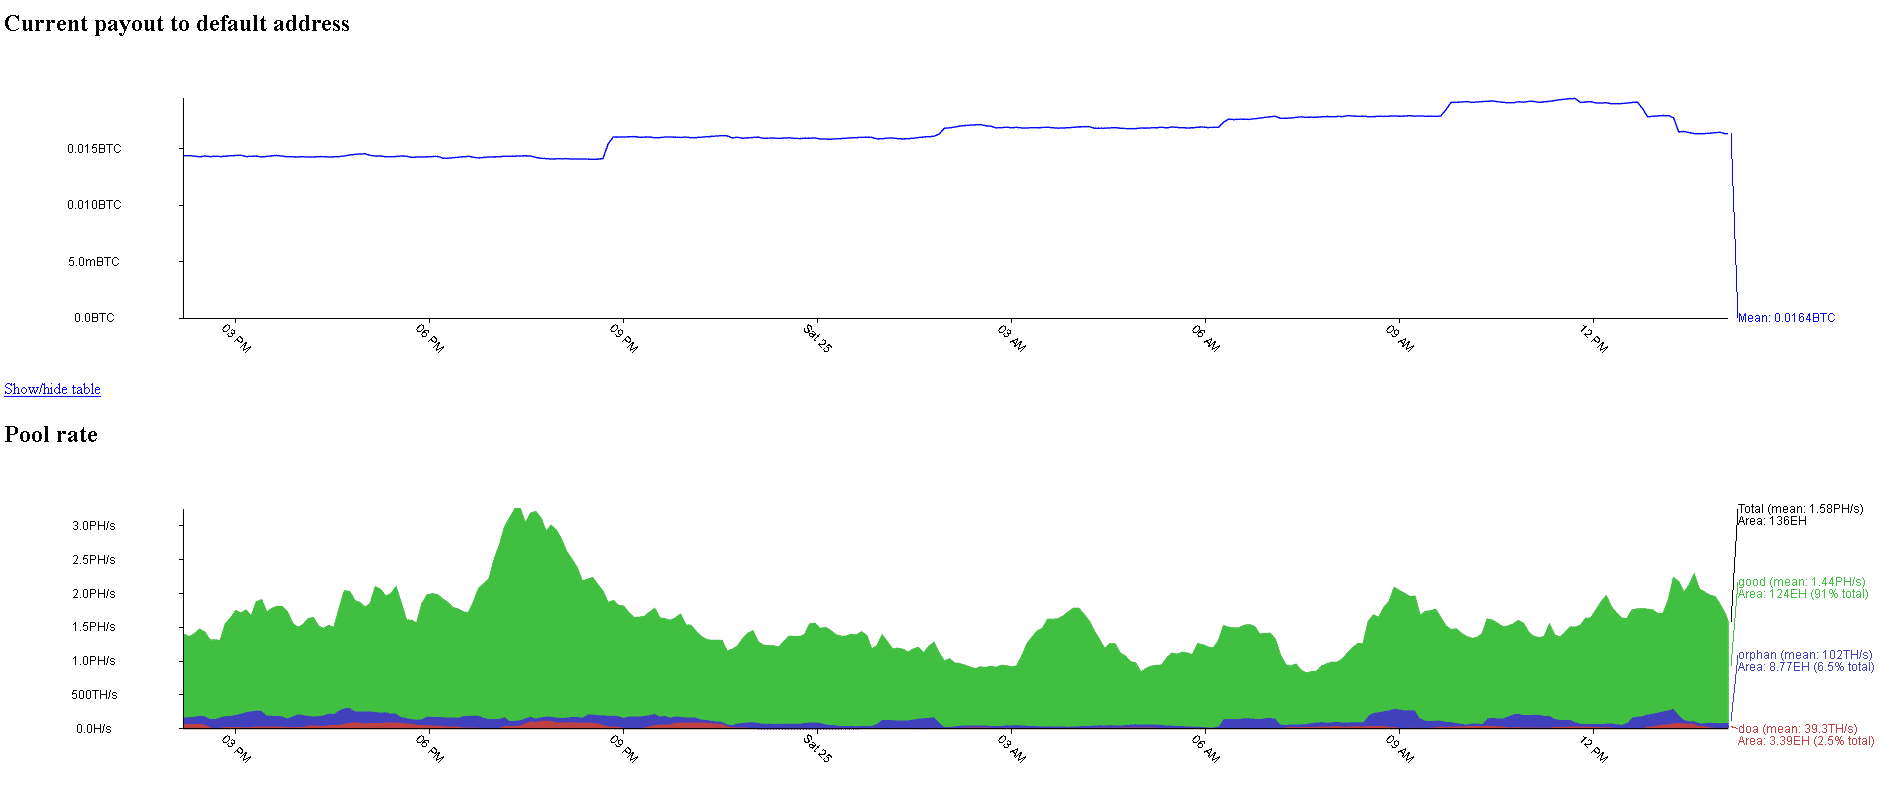
That’s it. You should see some text scrolling and that is it you are now mining bitcoins on p2pool. At some point you’ll see a share. This means if there is a block found that you will have a share in the sharechain and will receive a payout. It’s shares and block timing. I just made 5 MBTC today with some really good luck and 800Gh/s. Let me know how this goes for you. You want your efficiency to be above 120% hopefully. Try not to stare at them too long. 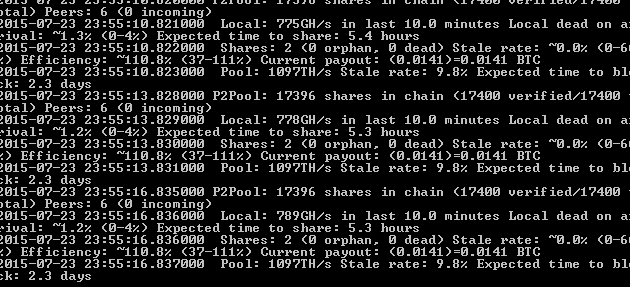
I hope this guide helps you. If you want more info or to connect to my node let me know in the comments.
3 Comments
можете помочь с настройкой p2pool btc
Yeah I am here but I can’t read Russian and Cyrillic text is lost on me. Using google translate I could. I am not sure if BTC mining has restrictions in your area. Please be sure you are in accordance with local law!