Ultimate Asus RT-N16 Setup
[dropcap]F[/dropcap]irst of all… This is intended to be the unofficial ultimate setup guide for the Asus RT-N16 router, but it will likely work with any other Asus router provided you are careful with your belongings. It will eventually be more or less a complete and comprehensive guide to the router’s functions and limitations. The guide requires you have a few things but all you really need is the Asus RT-N16, a USB key (USB2), a ext3fs Linux formatted USB hard drive and Tomato K26USB 1.28 MIPSR2 117 or later (AIO) by Shibby firmware as well. If you have a good ISP with fast upload speeds then you have could use an ultimate Asus RT-N16 setup that can easily access your files or network while abroad, download your torrents automatically for you, serve your media, host your files, track all your bandwidth and give you fast WiFi. It’s an always on home server, You can do a lot of cool things with this router. It does take a lot of setting up & if you’re intimidated by command line or the archaic vi text editor, it’s going to be a little rough.
But don’t worry.
Luckily I did it and can tell you everything I came across while trying to get the whole thing to work.
Here is a good rule of thumb. If you have two cars and a house half paid off, then you can build yourself a fancy home automation system with a powerful Linux distribution and graphics processing to serve scaling media to you while at home and abroad. Until then a low wattage light weight Linux system will have to do the lifting. I think for the $180CAD plus shipping this project will cost, MAXIMUM! Is way cheaper than an XBMC home theater PC, for which, a case just to house the computer will cost around $70.
It can be really helpful to get everything together before starting out on this nerdy voyage. There’s nothing like hitting a roadblock to get you to do something rash with the command line. It can ruin all your efforts if you try out a new Linux command you aren’t familiar with or one you found on a forum in quick desperation. Take your time, download Gparted, get Windows running on your Mac through bootcamp. You can’t really finish without them.
Now… The Ultimate Asus RT-N16 Setup
First of all start with buying the Asus router, USB stick and your hard drive. I had these things lying around but I’m a nerd. Using an 8gb Kingston Patriot USB flash memory stick you can track all your bandwidth and keep creepy tabs on everybody’s Google searches in the house. OK, the latter not so much, but you could. The USB flash is also good for swap memory, it’s fast and will wear out fast but those things are getting cheaper and cheaper, I’m not too concerned about it. This is also where you install software via an alternative package installer that will add programs to your router. I’m not talking anything fancy like your favorite bleeding edge game or even a word processor you’ve heard of… before. Even at the time of writing this article I had just heard about jed. The point is this is a 10 W tiny Linux kernel 2.6 computer. Jed is about as fancy as it gets on optware. It will take away all the pain of editing all the text based configuration files. Once you get optware up and running that is. But once you do have it running it just kind of is there, omnipotently kicking ass.
Also you should learn what SSH is. It’s going to be how you accomplish many of your tasks on the router. Once the whole deal’s done it’s a fast gigabit router that hosts your files for you when you are away and downloads you’re favourite show before you even know it’s been posted and operates a professional phone service for you and plays media to all your devices via dlna and has kick ass WiFi coverage… Yeah I thought so, eh.
Getting Tomato on your bloody router in the first place…
Ok, so this part isn’t so bad. Have you ever flashed DD-WRT onto a WRTG54? It’s a pretty arduous task to flash a router, safely. Most important part is the safely part. Not doing it correctly, or just plain old being careless can leave you with a bricked router the manufacturer may or may not replace. Luckily, with the Asus router you don’t really have to worry about it. First you need to download from a proprietary restoration utility from Asus. Pretty much, you’re gonna need Windows to get this part of the job done because the utility isn’t available easily any where else. I run a PC modified to run OS X so I just had to boot up in Windows. It can be a pain if you are on a Mac but just heed my advice, take your time and flash it properly.
Grab a copy of tomato here from the release page. If you have another router besides the RT-N16 then please google Tomato Shibby and your model to make sure you install the correct firmware. Some Asus routers have different chips in them and won’t work with the release I’m linking to. I chose the latest AIO USB release which means the router has USB and can handle the large flash which is about 9 megs at the time of writing this. Along with a few other specifications for the RT-N16, the k26 MIPSR2 build was the one I wanted.
Once you have the utility, put the router in restoration mode by holding the restore button as you plug it in. Hold it for about 10 seconds. You will see the power LED blink if done correctly.
Now sent your IP address at 192.168.1.10 and plug into one of the router’s LAN ports. Restore the image of Tomato by clicking restore and pointing to the image. Now some people say you should flash a DD-WRT installation onto the router and restore after that but it’s all just outdated bollocks.
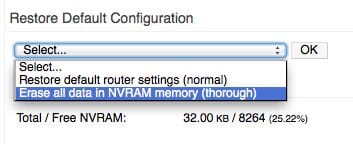
Give it time, go have a coffee and relax. It can take up to five minutes for this part to take. Once your router is up and running I’d advise you to flash all the NVRAM. If you can’t reach the GUI you need to hold the WPS button for 30 seconds erase the NVRAM.
Now we can begin to start… Wi-Fi!
I’d say get your WiFi up and your LAN. The LAN should be plugged in because it’s our reliable line to the router to configure the wireless adapter. Second, setup security,unless you are the extremely charitable type. I use WPA2 because it’s harder to crack. Passwords are tricky. If you’re misreable with them, try four words rather than the usual leet speak alphanumeric gibberish. It’s cryptographically more complex and easier to remember, just stick a number in there for good measure. Getting the WiFi working is finicky but that’s only because the “auto” feature kind of sucks (if you expect it to be fast and easy). I would suggest using auto in a pinch but don’t expect it to find a fast channel quickly. Scan your area with the built-in site survey tool, it’s effectively going to disconnect all wireless clients so being connected via LAN is good here. In my area now channel 3 works best. At my last apartment it was channel 11 that was the winner. You have to just see what works and what doesn’t. When you are done though you should see speeds on N type devices around 20mb/s on inbound connections. I just kind of waited till the WiFi was really fast and took note of what channel auto had loped over to.
Next plug in your USB2 drive.
I say USB 2 because I heard USB 3 can cause issues with poor shielding, ravaging your WiFi network. I had noticed an effect with a newer drive I had been using but maybe I am just going crazy.
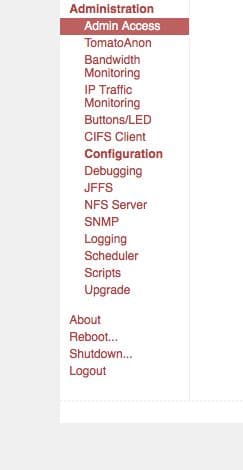
At this point you need to enable the USB driver on the router. Also you need to turn on some remote administration settings that will allow you to get into the command line via ssh and install optware. You can turn on telnet but I think SSH is more powerful. SSH require you use PUTTY on a PC. I think telnet is built into Windows going back all the way to XP but am not certain. These two methods of connection help you configure the router, administer it from afar or just kick it in the ass when the router isn’t working. It is necessary when installing optware. Just click the check boxes in the webgui to turn on those connection protocols.
This is where I learned how to install optware.
I didn’t have Linux at home at the time of my second installation of Tomato. Yes, second installation. I had one Tomato router but the sheisty wiring in my apartment took it from me too soon. Luckily Asus were nice enough to send me another one. The second time I didn’t have gparted live on a disk, or Ubuntu installed to set up the USB disks with my PC again. I just had terminal and my router. Anyway the guide here will take you through if you are without patience or Linux, but Gparted sure is sweet to use and saves you a lot of trouble sizing the partitions with fdisk. I would suggest using ext2fs so you don’t have excessive writes to the Kingston flash disk due to the added journaling of ext3fs. Also, don’t use a NTFS or FAT partition, in my experience it will just be a pain in the ass.
I made 3 partitions. One, just about a gigabyte for optware (a little overkill). Be sure to label this partition optware as it will be referenced in later commands! One for a small swap partition (I used 512mb). As well you can make a data partition. Here you can setup logging for your bandwidth or what have you. It’s great to know how much internet you’re using, especially if you are on a tight cap. People say using a USB stick will kill it quickly but I just want to test that theory out with a Kingston key, I’ve beat them up and never had one die. I will edit this if it does.
At this point you should probably format your USB HDD as ext3fs. I had an NTFS drive that just would not play nice. Again, YMMV and you could well just plug in a disc from your mac or PC and get it up and running. I found the DLNA server would just never finish scanning. It could have been a permissions issue but none the less. You could also put your swap partition on the HDD instead of the USB stick if you would like to play it safe. I like to live fast and break things when it comes to my ultimate Asus RT-N16 setup.
Once everything is formatted. This init command should be placed in the script page of the GUI, EXAMPLE:
[box]echo “LABEL=optware /opt ext2 defaults 1 1” >> /etc/fstab[/box]
You can install optware by simply running these three commands in order via Telnet or SSH:
[box]wget http://tomatousb.wdfiles.com/local--files/tut%3Aoptware-installation/optware-install.sh -O - | tr -d '\r' > /tmp/optware-install.sh
chmod +x /tmp/optware-install.sh
sh /tmp/optware-install.sh[/box]
That’s that. Optware installed. In the scheduler page you should add a custom script to run once a week to update the package database. It makes sure you’re installing from the latest and greatest stable packages.
[box]ipkg update | logger -t Optware[/box]
Now go to the Transmission at http://192.168.1.1/nas-bittorrent.asp page of the router. This is the torrent client built into TomatoUSB AIO. It has a webgui as well that you set the port on. When trying to access it you need to put the address of your router into the browser. Locally (in your house) the address is 192.168.1.1 but when you are out of the house it will be that of your WAN IP. This is the IP your service provider assigns to your modem. If you want to access this outside of your house there is one another step for this. I’ll put that here.
Set a password for the webgui so it’s secure and set the download path to your USB HDD. I use the recommended setting of saving the config file to the download location. This information is all important because we are going to install a python program called flexget. It’s a lot of work getting the ultimate Asus RT-N16 setup going but it really is worth it. As a low wattage device I can have my power go out and my UPS will run my network for an hour on a 350W UPS.
Flexget, It’s a remarkable program.
It’s really slow to respond on Tomato but it doesn’t really matter, it’s faster than you are. It can check a list of sites for a list of series, compare all the files available and then pick one and start downloading it, in about a minute. You need to mirror your login information from the Transmission settings into the config file we are going to create. This config file allows flexget to scour the web. The site I used to get this done is here. VAXXI did us a solid when he tried this out. Since flexget is coded in python you need to install it by entering the following commands in telnet or ssh:
ipkg install py26-setuptools

export PYTHONPATH=/opt/local/lib/python2.5/site-packages:/opt/local/lib/python2.6/site-packages/

easy_install flexget
Next you need to test if flexget installed correctly and to create a config file for flexget. It’s a text file that you can easily edit using jed. I created a hidden folder to put the configuration file on my server but make it invisible to users and programs. First install jed:
ipkg install jed
Once it’s installed in the /opt/local/bin/ folder just be sure you get a version returned when you enter:
/opt/local/bin/flexget -V
Next just run jed, specify a path on your HDD. We will invoke a –config flag in a later command to call this file as our configuration.
Jed is easy enough to maneuver. Paste the text below the break into the document, edit the path, login info, shows and save it. Be very careful when editing though, as flexget is brittle in it’s syntax. Use two spaces when entering a new list.
This cookbook config downloads the best quality version of a show that is posted. Schedule the command to run in the Tomato webgui. Just make sure you use the correct syntax. nice -n 19 /opt/local/bin/flexget -c /mnt/yourpath/.flexget/config.yml execute. If you need to create folders just user mkdir and be sure to use proper syntax because it won’t work if you don’t. There is nothing less forgiving than a computer that wasn’t programmed to be forgiving. That said the nice command is here to be sure Linux commands play just like it says; nice. The n flag proceeded by it sets up the niceness level which goes from 10 – 19. Its called the nice command but it’s generous too.
It’s a Linux command that works with cron or cru in this case, to make sure when a command runs it will share processing resources. I had an issue where transmission would lock up. I noticed the large list of series I had configured flexget to look for was doing thousands of queries and robbing transmission of any processing power. I used the ‘top’ command and sure enough flexget would spike at 100% CPU and bam transmission would flatline. Now when transmission needs to update an HTML GUI or allocate hard drive space it won’t be left in the lurch to just fall flat.
This one makes me happy. It takes a processor and packages that would otherwise be unusable due to optimization issues but still let’s you tweak them to coexist in the same environment. Linux is such a beautiful thing. It’s free, so if you can get a computer you can run Linux.
[quote] A folder with a period as it’s first character under Unix will make a folder invisible. [/quote]
Once you have created your config file test it out by running: /opt/local/bin/flexget -c /mnt/yourpath/.flexget/config.yml check
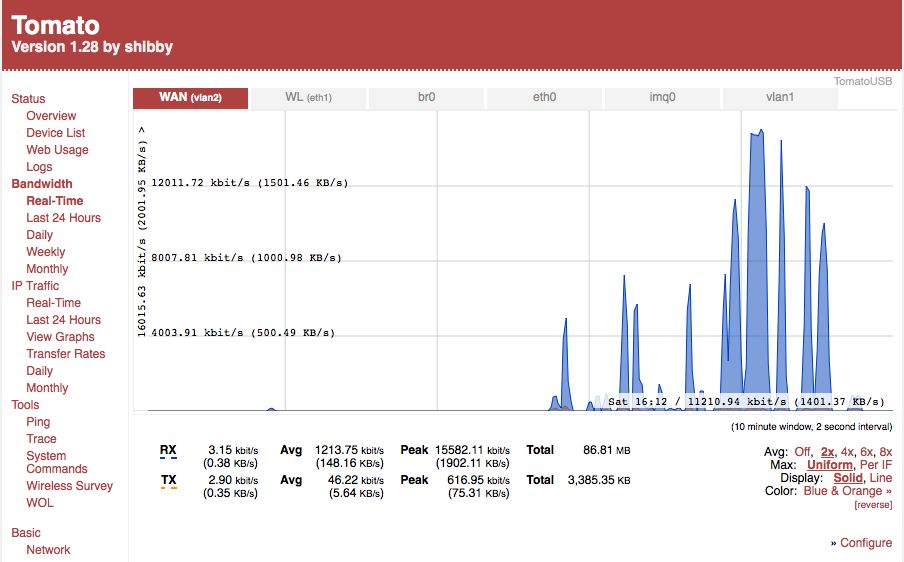
Now if you want to set up bandwidth monitoring follow this link.
That’s it!
You are partly there when going for the ultimate Asus RT-N16 setup, you now have an automated torrent downloading router.
You can follow this link to setup QOS, so your skype calls aren’t choked by torrenting.
This link will show you how to easily manage the files on the router.
Right here is where you can learn how access any machine on your home network from anywhere.
This link will show you how to create your own FTP server.
I have edited this to reject WMV and to have a quality requirement per show. I think this is the best way to go as some shows are uploaded at different resolutions.
templates:
  tv:

#    manipulate:
#      - title: &the
#          replace:
#            regexp: '^The\W'
#            format: ''
#      - filename: *the
#      - series_name: *the

    private_torrents: no

    series:
      settings:
        tv:
          exact: yes
          propers: 3 days
          quality: hdtv
          content_filter:
            reject: '*.wmv'
          set:
            path: /mnt/your/path/to/persistent/storage/{{series_name}}
      tv:
        - North Parkland
        - Ink Supreme
        - The Gawking Dead
        - Glitchen Nightmares US
        - Working Too Much
        - Always Sunny
        - South American Happy Story
        - Dr. Steve

    transmission:
      enabled: yes
      host: localhost
      port: 9091
      username: youruser
      password: yourpassword

tasks:
  bt-chat.com-tv:
    priority: 1
    rss:
    template: tv

  ezrss.it:
    priority: 2
    rss: http://ezrss.it/feed/
    template: tv

  thepiratebay.org-tv:
    priority: 3
    rss:
    template: tv
    verify_ssl_certificates: no

  kat.ph-tv:
    priority: 4
    rss:
    template: tv

  extratorrent.com-tv:
    priority: 5
    rss:
    template: tv

  torrentz.eu-tv:
    priority: 6
    rss:
    template: tv

  showrss.karmorra.info-tv:
    priority: 7
    rss: http://showrss.info/?cs=blog&id=45/feeds/all.rss
    template: tv
That is it!
ENJOI!
Please donate if you found this helpful!
3 Comments
Hello, thanks a ton for taking the time to make this guide.
I need assistance though, if you would be willing.
There is an error when I run flexget. Here is the output.
I would appreciate any assistance very much.
Cheers!
Hey Brandon,
Looks like a character is illegal. Flexget has some rules about formatting. Numbers need to be surrounded by ‘marks’. Like ’24’ hours in a day. Run check instead of execute and pastebin the output. I will try and see what is up.